


Black Zone gathering is one of Albion Online's most reliable high-risk, high-reward professions. The Black Zone uses full-loot PvP, so another player can take your carried equipment and inventory when they kill you. You will eventually lose a set. The goal is not to make every trip deathless - it is to prepare well enough, spot danger early enough and bank consistently enough that successful trips comfortably pay for the losses.
This guide is for open-world Black Zone gathering. Mists and the Roads of Avalon have different traffic, exits and escape patterns, so do not copy every recommendation into those activities without adjusting it.
Black Zone gathering in 30 seconds- Start with a set and mount you can afford to replace at least ten times.
- Level one gathering line with its matching cap and garb before spreading progression across several resources.
- Bank once your carried value reaches the cost of your full loadout, or exceeds the amount you are willing to lose.
- Stay mounted whenever possible, inspect unfamiliar players and leave before a suspicious group can organise around you.
- Practise one complete dismounted escape sequence until it is automatic.
Avoid likely gankers. Avoid being dismounted. Do not panic. Your survival odds fall at each stage, so the best escape is the one you never need to use.
Best Black Zone Gathering Builds and Gear
A gathering set must do two jobs: increase yield for the resource you are targeting and create enough distance to remount if you are dismounted. The standard setup combines a resource gathering cap and garb with  Miner's Workboots, a mobility weapon and an escape cape. Add
 Pork Pie and carry multiple
 Invisibility Potions for repeated encounters.
The 10x rule protects your decision-making as much as your silver. A more expensive set is not automatically safer if fear of losing it makes you take fewer trips, ignore your planned bank threshold or hesitate when you should abandon a node. Downgrade the gear or mount until one loss will not change how you play the next trip.
Interactive buildChoose your gathering loadout
A Dual Swords escape chain built around Iron Will, Ambush and Flee.
Published build by ummahuslaDual Swords Escape (Iron Will) Build


 Open full build
Core inventory
- The gathering tools required for the biome and resources you plan to harvest
- Empty gathering journals for the resources and tiers you expect to gather
- At least two Invisibility Potions, so one failed encounter does not force an immediate trip home
- One Pork Pie for each planned 30 minutes, plus one or two spare in case the trip runs longer
 Gathering Potions for 6.3-equivalent resources or above, such as 6.3, 7.2 or 8.1, where the extra yield is more likely to justify the cost
- A bag only when its carry weight is useful enough to justify its replacement cost
Each gathering profession has journals from Tier 4 to Tier 8. An empty journal fills passively while you gather its matching resource, creating additional value from a trip you were already taking. Common T6 choices are:
- Hide:
 Master Gamekeeper's Journal (Empty)
- Fiber:
 Master Cropper's Journal (Empty)
- Ore:
 Master Prospector's Journal (Empty)
- Wood:
 Master Lumberjack's Journal (Empty)
- Stone:
 Master Stonecutter's Journal (Empty)
A resource can fill a matching journal of its own tier or up to two tiers below it. For example, T6, T7 and T8 ore can fill a T6 Prospector's Journal, while T6 and T7 ore cannot fill a T8 journal. T7 and T8 journals are slower to fill because those resources are scarce, so T6 journals are a strong general choice for established Black Zone sessions. If your route is mostly T4-T6, bring lower-tier journals that match what you will actually gather.
Best Mount for Black Zone Gathering
There is no single best gathering mount. Choose between gallop speed, carry capacity, replacement cost and proximity to safety.
- Gallop speed makes it harder for a scout to stay on top of you and gives a gank group less time to set up ahead.
- Carry capacity only matters when you will use it. Paying for unused capacity on a 30-minute trip puts extra silver at risk.
- Cost should scale with the value of your full set. Do not take a mount you are unwilling to replace.
- Passive carry weight matters after a dismount. A huge mounted capacity can become a trap if losing the mount leaves you unable to move.
Match the mount to the trip
Start with session length and the weakness you most want to cover.
Session lengthMain priorityRecommended starting point Moose
Medium or long trips balancing speed, capacity and cost
Speed120%CapacityGoodCostMediumMarket prices vary by server and day. Treat cost bands as relative and check the live market before buying.
| Mount | Speed | Capacity | Best use | Main weakness |
|---|---|---|---|---|
 T5-T8 Riding Horse | 115%-135% | Low to moderate | Short, speed-focused trips | Higher tiers become expensive |
| Gallant Horse | 125% | Low | High-value short trips near an exit | Its escape shares the boots-slot cooldown |
 Stag | 105% | Moderate | Cheap beginner trips | Easy for organised groups to keep pace with |
| Moose | 120% | Good | Balanced roaming | Costs more than a beginner mount |
 Saddled Swamp Salamander | 100% | Good | Gathering near a safe base | Poor for crossing many zones |
| Grizzly Bear | 75% | Very high | Local hauling beside safety | Slow and often overburdened after dismount |
| Spectral Direboar | 115% | Very high | Valuable loads for experienced gatherers | High replacement cost |
Mount prices change across servers and over time. Compare current listings rather than treating a published silver price as permanent. The site's mount speed table, transport capacity table and price search are better sources for a live buying decision.
Active mount ability trade-offGallant Horse has 125% gallop speed and Relentless Charge, which temporarily increases speed while making the rider immune to damage and crowd control. It suits high-value short trips where the ability can reach an exit before the mount's low capacity matters.
Spectral Direboar combines very high passive carry capacity with Glimpse of the Other Side, which turns the rider invisible for five seconds. It is the stronger active-escape choice for 30-90 minute and long-haul gathering trips.
Using either active mount ability starts a boots-slot cooldown. If you are dismounted before it ends, your equipped boots ability will be unavailable, so activate the mount ability only when its immediate escape value outweighs that risk.
Four Ways to Gather in the Black Zone
Your access route determines which gear, tools and mounts make sense. Pick the operating model first, then build the set around it.
1. Gather from guild territories or hideoutsBest for: players with established Black Zone access.
Advantages
- Friendly territories and hideouts provide frequent safe exits.
- Home zones deep in the Outlands can provide access to high-tier, high-quality zones.
- Repeated local sweeps make slow-respawning T7 and T8 nodes easier to find.
- Nearby allies can make mixed gathering and PvE sets more viable.
Trade-offs
- Friendly gatherers compete for the same nodes.
- Low-tier or low-quality home zones may be disappointing.
- Moving stock back to a Royal City can become a separate transport operation.
Best for: flexible gatherers who value a quick, unpredictable entry.
Advantages
- It can place you far from portal-town traffic and occasionally near excellent zones.
- The portal is a convenient local escape while you remain on its map.
- Journey Back gives you a planned route home if the trip stays under control.
Trade-offs
- The destination and available resources are unpredictable.
- Bringing several tools increases the set value at risk.
- It is less efficient while only one gathering line is levelled.
Best for: a planned route to a known biome.
You can bring only the tools and gathering gear the destination requires. The weakness is travel time: better zones deeper in the Outlands are farther from portal towns, and every extra map creates another opportunity to meet scouts or roadblocks.
4. Base yourself in a Smuggler's DenBest for: independent gatherers who want a repeatable Black Zone base.
Choose a den near high-tier zones but still within a tolerable transport distance of your main portal town. A local market helps replace supplies, while the safe entrance makes situational mounts more practical. Expect competition: solo players, small groups and gankers may all use the same den as a base.
For a fully solo player, a sensibly located Smuggler's Den is often the best long-term base. The SAFE Portal is the easiest way to begin without committing to a location.
How to Gather Efficiently
Your strategy should change as your gathering progression improves.
- Reach your first T8 line: wear the matching gathering cap and garb, then gather useful T4-T6 nodes for that resource. The gathering set improves yield and fame, while consistent nodes level faster than waiting for rare T7 or T8 spawns.
- Level another line: switch to that resource's gathering cap and garb and repeat the focused T4-T6 progression route.
- Specialise for profit: stay focused on your established line, roam between T6-T8 zones and prioritise valuable enchanted nodes. Once several lines reach T8, bring their tools and monetise more of every map.
What is the difference between resource nodes and resource mobs?
A resource node is a normal harvestable object such as a tree, ore deposit or fibre plant. A resource mob carries harvestable resources but must be defeated before its remains can be gathered; hide animals are the most familiar example, while other resources also have matching creatures.
What are Dynamic Resource Hotspots and Resource Mists?
Dynamic Resource Hotspots concentrate many resource mobs of one type in a small area, so they are valuable but easier for other players to predict and contest.
Hotspot sites are recognisable, but the event at each site is temporary rather than permanently active. When a Dynamic Resource Hotspot is active, its resource icon appears over the location as you approach. Reaching one early can provide a dense group of matching resource mobs.
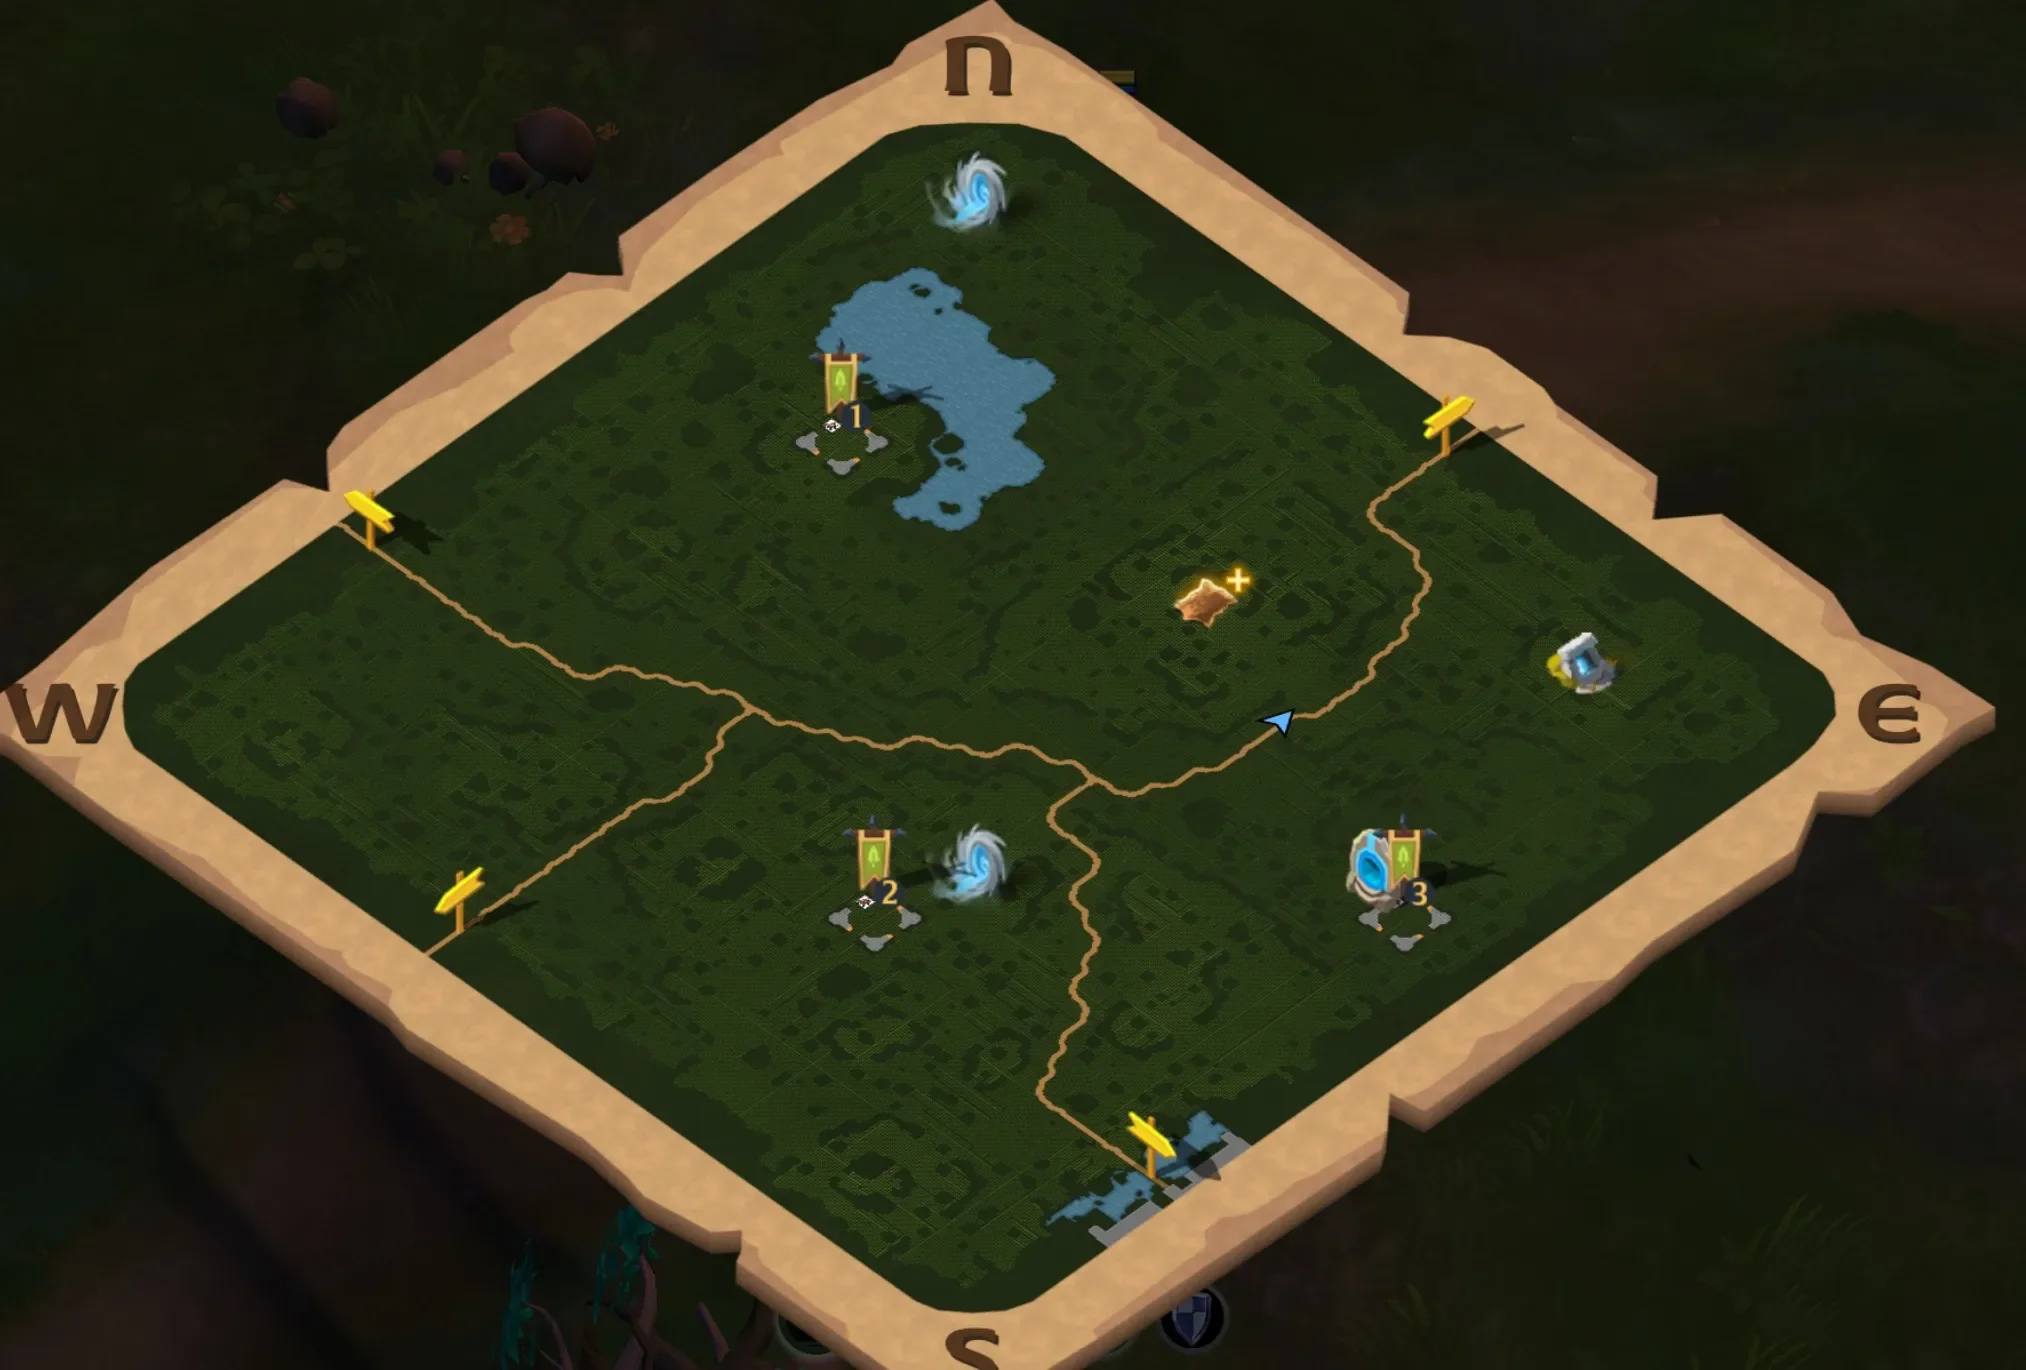 Example map layout for a Hide Dynamic Resource Hotspot. Other resources use different layouts.
Some hotspots contain Verdant Wisps leading to a Resource Mist for that hotspot's resource. A Small Resource Mist is a solo instance; a Medium Resource Mist can contain other players, so treat it as lethal until you have confirmed the situation.
Route and node discipline
- Check the middle of the map. Many gatherers hug the edges because they feel safer, leaving central nodes less contested.
- Do not wait beside depleted T7 or T8 nodes. Their long, variable respawns make camping inefficient.
- Use Roads of Avalon portals as optional connections to other high-tier zones, but inspect the route before committing.
- Use Gathering Potions on 6.3-equivalent resources or above, such as 6.3, 7.2 or 8.1, where the extra yield is more likely to repay the consumable.
- Leave zones showing 16-30 players when you cannot see an activity or blob explaining the count.
- Treat prime time as a deliberate risk choice. More activity can improve resource availability, but it also produces more organised gank groups.
T7 and T8 node respawn timers change with activity and are difficult to measure conclusively. Server reset can create a rush because nobody gathers during downtime, but fixed hour-by-hour spawn claims should be treated as anecdotal, not a timer.
How to Survive Black Zone Gankers
Some ganks are not survivable. A coordinated group can cover every exit and dismount ahead of your route. Your aim is to make that level of coordination necessary.
Beginner tell: watch behaviour, not only gearA scout's job is usually to maintain vision while partners move into position outside your screen. Treat a player as a possible scout when they mirror two direction changes, ride parallel instead of passing, wait between you and a safe exit, or disappear towards your likely route and return. Equipment is only a clue; repeated tracking behaviour is the stronger signal. You do not need proof to leave. Turn towards the route you already cleared, choose another exit or bank before the group can form ahead of you.
Detect danger before contact
Every player you run into in the Black Zone is a possible threat. Constantly scan the edges of your screen for names of approaching players, and consider leaving immediately when spotted.
- Toggle Hide HUD with Alt+J by default, flicking it on and off so nameplates cannot remain hidden behind the interface.
- Use Inspect Target with Y by default to inspect unfamiliar players immediately.
- Learn common ganking signals. Examples include
 Mace,
 Claws,
 Bear Paws,
 Graveguard Armor,
 Knight Armor,
 Sticky Potions and fast scouting mounts.
- If a player is dismounted and has no yellow mount-health bar, turn away immediately.
- Keep game audio high enough to hear a nearby dismount or Invisibility Potion.
- Be aware that gatherers may leave vision, change into ganking equipment and return to attack you.
- On a large node, remount periodically. If another player is dismounted nearby, the warning exclamation mark above your character gives you information you would miss by remaining dismounted until the node is empty.
Reduce exposure
- Gather outside peak activity until you trust your own reactions.
- Avoid travelling directly along the obvious road through a zone.
- Do not contest a plentiful node when the map feels busy and you cannot identify the other players.
- If a map suddenly fills without a matching blob, change map, use Journey Back, enter a Road, or wait inside suitable instanced content.
- If gankers are visibly controlling the next zone's entrance, turn around rather than riding into their setup.
Be difficult to predict
Do not run in a straight line towards the most obvious exit. Change direction sharply and make scouts guess where their group should dismount. If the first pursuer approaches from ahead, reversing towards the route you already cleared is often safer than continuing towards their teammates.
Know your nearby escape options
- Map Exits - strongest when the next map is a portal town, rest or another safe location.
- Roads of Avalon - useful against a large group because portal capacity can split the pursuit.
- Smuggler's Dens and Friendly Hideouts - reliable when the entrance is already close.
- Mist Wisps - can create an escape, but opening and channelling the portal takes time.
- Randomised Dungeons - can move you off the immediate route, but pursuers can follow before the entrance closes and another player may already be inside. Treat entry as a route change, not immunity.
- Corrupted Dungeons - can break an open-world pursuit if you complete the entry and meet the base Item Power requirement. Stalker and Slayer remain full-loot PvP and you may be invaded, so this swaps a group chase for possible 1v1 danger rather than providing safety.
Logging out can end a trip after the group has lost you, but it cannot save an active chase. Move away from roads, exits, objectives and the place you were last seen before starting the countdown. Your character remains in the world until it completes, and taking damage or acting cancels the attempt. If pursuers still know the area you are hiding in, keep moving towards a real safe exit instead.
Dismounted Escape Plan
When your mount dies, the following sequence should be the basis of your escape plan.
Ability order mattersUse every mobility and defensive ability before Flee silences you. With Dual Swords, do not hit another player with Spinning Blades if a zone exit is part of the escape plan.
If you are dismounted directly beside a map exit, stall for as long as you safely can before crossing. Going through immediately means your 30-second invulnerability bubble can expire at roughly the same time as your 30-second remount timer, leaving no time to mount and create distance. Waiting before you cross lets the remount timer keep running, so you can mount and move before the bubble expires. Ambush from an  Assassin Jacket can buy time, but it may be too risky against a large group. Block from a
 Soldier Helmet should still be used.
- Use Ambush. Move away from the group while invisible. If it is purged immediately, continue the sequence.
- Create distance with Spinning Blades. Do not hit a player if a zone exit is part of the plan.
- Use Iron Will. Protect the next movement effect from a purge.
- Use Flee. This silences you, so every other active ability must already be used.
- Drink an Invisibility Potion. Change direction once hidden instead of continuing along the path the group expects.
- Survive the remount timer. Create distance, break vision and remount when the cooldown ends.
Invisibility Potion stealth begins immediately even though your own client shows a fade. Unlike Ambush, taking damage can reveal you. A near-certain exit is worth taking; otherwise an unexpected 180-degree turn often beats running towards the route every ganker is already covering.
Use the full sequence in a safe zone until the key order is automatic. This reduces the number of decisions you must make under pressure, but it cannot recreate the adrenaline of your first real ganks. Expect panic and some losses while learning. Keep early sets affordable, review one decision after each attempt and do not let a failed escape stop you trying again.
Review failed escapesEvery gank is different. Record gathering sessions when possible, then review failed escapes for the first warning you missed, your ability order, nearby escape options and whether your route was predictable. You can also submit the recording to the Albion Online Grind Discord for another perspective.
Black Zone Gathering Checklist
Decide the bank threshold before leaving. The right number is the amount of carried value you would be annoyed to lose, not an arbitrary target copied from another player's economy.
Saved on this deviceReady to leave?
0 of 7 checks complete
- Correct gathering gear and escape abilities equipped
- Tools for every resource you intend to gather
- Empty gathering journals
- At least two Invisibility Potions
- One Pork Pie per planned 30 minutes, plus one or two spare
- Gathering Potions for 6.3-equivalent or better nodes
- A bank threshold decided before leaving
Black Zone Gathering FAQ
Which resource should I gather first?Every gathering line can be profitable at T8. Start with a resource that is common in the biome connected to your portal city. Hide tends to sell well but requires killing resource mobs, increasing the time spent dismounted. Stone has historically had a weaker early-tier economy but less competition at high tiers. Check current resource prices before committing for profit alone.
Which resources appear in each Albion Online biome?Each open-world biome has a primary, secondary and tertiary resource. Primary resources are the most common, so your portal city and planned route should influence which gathering line you level first.
| Biome | Primary | Secondary | Tertiary |
|---|---|---|---|
| Steppe |  Hide |  Fiber |  Ore |
| Forest |  Wood | Hide |  Stone |
| Swamp | Fiber | Wood | Hide |
| Mountains | Ore | Stone | Fiber |
| Highlands | Stone | Ore | Wood |
Yes, if the goal is to reach a specific T8 line quickly. Matching gathering gear adds yield and fame for that resource, so splitting attention before the first line is established slows focused progression. Multiple T8 tools become powerful later because enchanted-node roaming can monetise more of each map.
Should I spend Learning Points on gathering?If gathering is a serious progression goal, Learning Points are one of the strongest ways to shorten its slow unlock curve. Reserve them for gathering milestones rather than spending them casually across unrelated trees. Track the plan in Mastery Management before committing scarce points.
What is the fastest route from beginner to T8 gathering?- Unlock the chosen line in safe T3 zones.
- Equip the matching T4 gathering cap and garb, then gather abundant T4 resources in T5 or T6 zones.
- At T5, gather T4 and T5 resources with the upgraded set.
- At T6, harvest T4-T6 resources in T6 zones and visit resource hotspots.
- Continue on abundant T4-T6 nodes rather than trying to level mainly from rare T7 and T8 spawns.
Miner's Workboots remain the escape choice even when another resource line is being levelled.
Bank when losing the current inventory would change your mood or your next plan. As your economy and experience grow, that threshold will naturally rise. Do not let unused mount capacity decide how long you remain exposed.
Is Black Zone gathering worth it?Yes, when the extra yield and progression from successful trips exceed the replacement cost of failed ones. Start with an affordable set, decide the carried value that triggers a bank run and judge the method across several trips rather than one death or one exceptional haul. If the risk makes you gather less consistently, improve the route or lower the set cost before increasing investment.